Create script for AWS Lambda to migrate old VPC flow logs
Contents |
This procedure makes use of a JS script and the AWS Lambda service to automatically migrate data from your live bucket (the one that collects your VPC flow logs) to an archive bucket (a bucket that will receive the old flow files using the script).
This script will let you move or delete old VPC flow logs as required by your organization. To do this, you will use an AWS Lambda script with the Node.js 16 JavaScript engine.
You will then set this script to run every hour using the instructions below. If you have more than 1000 new flow logs pre hour, then you may want to increase this execution rate, as only 1000 files will be processed in each run.
Before you proceed make sure that you have the correct AWS permissions to perform the following actions:
- Create Lambdas.
- Access S3 buckets.
- Change the Lambda execution policies.
You will also need to create an S3 bucket to receive the archived flow logs.
Create the AWS Lambda function
1. Login to the AWS portal.
2. Search for the Lambda service and click the related result.

3. In the upper-right corner of the Lambda > Functions page, click the Create function button.

The Create function page shows.
4. Select the Author from scratch option.
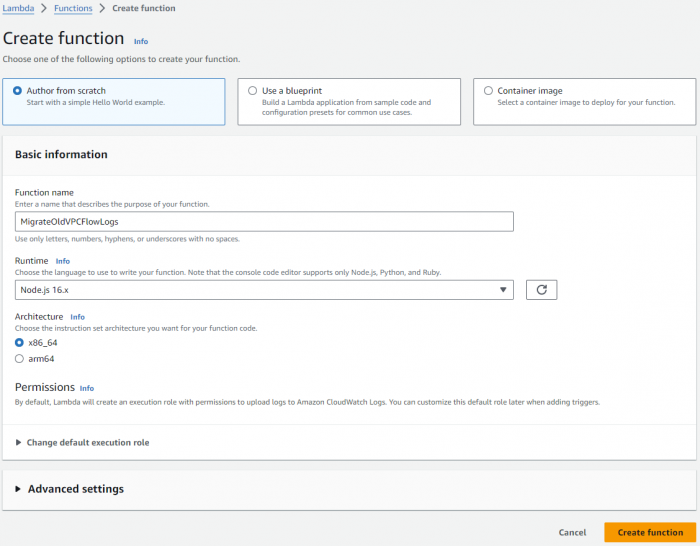
a. In the Function name field, enter the designation of your Lambda function (for example, MigrateOldVPCFlowLogs).
b. In the Runtime drop-down list, select the Node.js 16.x option.
c. In the bottom-right corner of the page, click the Create function button.
Your function is now created and its related page shows.
Configure the AWS Lambda function
On your newly created function's page, use the tabs in the middle of the page to set the correct sizing and permissions.
1. On the Configuration tab, select the General Configuration left-hand submenu.

2. In the upper-right corner of the General Configuration panel, click the Edit button.
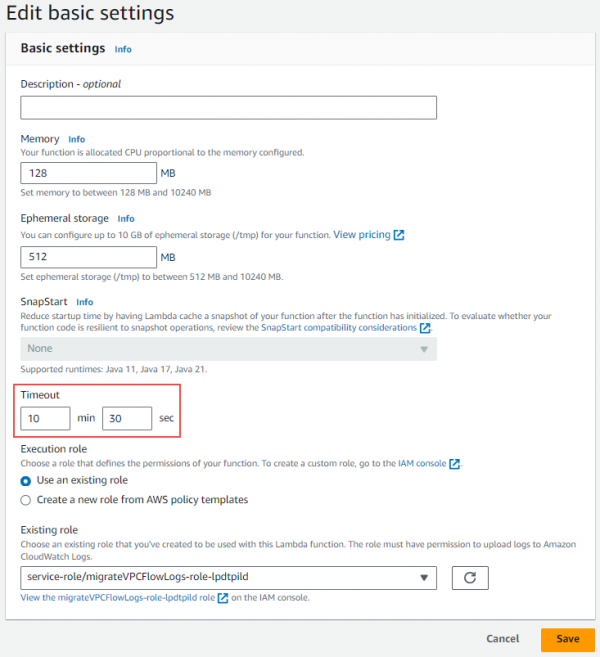
The Edit basic settings dialog shows.
3. Set the Timeout fields to 10 min and 30 sec.
| Note: The script may take a long time to run at first but will then get quicker as there are less files to query and migrate. |
4. Click the Save button.
5. On the Configuration tab, select the Permissions left-hand submenu.

6. In the Role name section, click the name of your execution role to edit it. This way you can read, move, or delete the S3 objects.
The IAM (Identity and Access Management) page related to your role opens in a new tab.
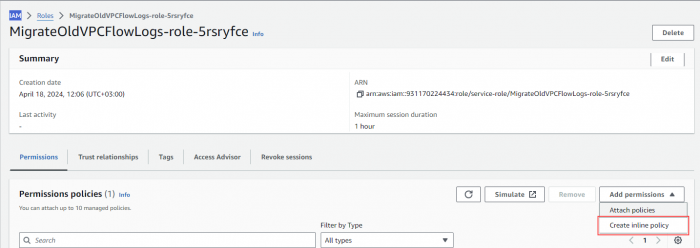
7. In the Permissions Policies frame, from the Add permissions drop-down list, select the Create inline policy option.
The Create policy page shows.
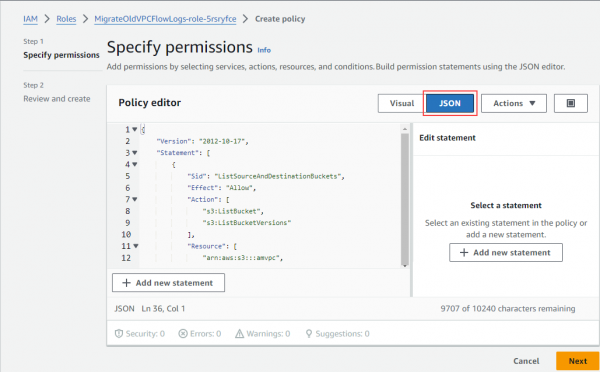
8. For the Specify permissions step, click the JSON button and replace the current code in the Policy Editor window with the following one:
| Caution: Make sure to replace the existing buckets (amvpc and amvpclongtermstorage in this example) with your own values. |
{
   "Version": "2012-10-17",
   "Statement": [
      {
         "Sid": "ListSourceAndDestinationBuckets",
         "Effect": "Allow",
         "Action": [
            "s3:ListBucket",
            "s3:ListBucketVersions"
         ],
         "Resource": [
            "arn:aws:s3:::amvpc",
            "arn:aws:s3:::amvpclongtermstorage"
         ]
     },
     {
         "Sid": "SourceBucketGetObjectAccess",
         "Effect": "Allow",
         "Action": [
             "s3:GetObject",
             "s3:DeleteObject",
             "s3:GetObjectVersion",
             "s3:DeleteObjectVersion"
         ],
         "Resource": "arn:aws:s3:::amvpc/*"
     },
     {
         "Sid": "DestinationBucketPutObjectAccess",
         "Effect": "Allow",
         "Action": [
             "s3:PutObject"
         ],
         "Resource": "arn:aws:s3:::amvpclongtermstorage/*"
     }
   ]
}
9. Click the Next button and then the Save button.
10. Return to your Lambda function page.
11. In the middle of the page, select the Code tab.
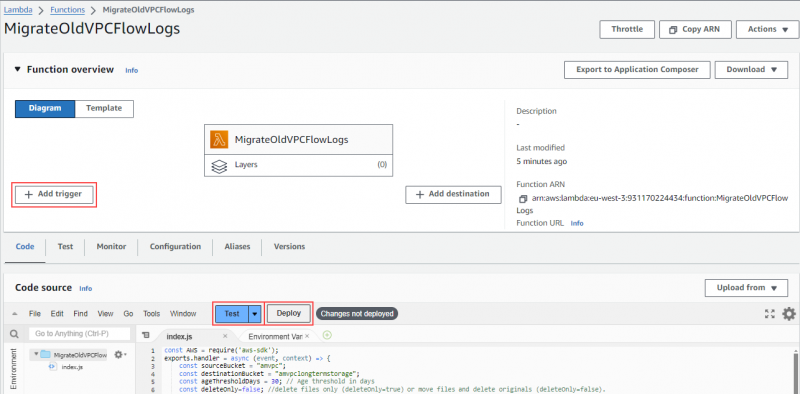
12. In the Code source frame, select the index.js editor and enter the following script:
Caution: Make sure to replace the following variables as appropriate:
|
const AWS = require('aws-sdk');
exports.handler = async (event, context) => {
    const sourceBucket = "amvpc";
    const destinationBucket = "amvpclongtermstorage";
    const ageThresholdDays = 30; // Age threshold in days
    const deleteOnly=false; //delete files only (deleteOnly=true) or move files and delete originals (deleteOnly=false).
//===============================================================================
//==========       Do Not Change Anything Below This Line     ===================
//===============================================================================


   const ageThreshold = ageThresholdDays*24*60*60*1000; // Age threshold in milliseconds

   // Create S3 service objects
   const s3 = new AWS.S3();

   try {
       // List objects in the source bucket
       const listObjectsResponse = await s3.listObjectsV2({
           Bucket: sourceBucket,MaxKeys: 2147483647
       }).promise();

       // Filter objects based on age
       const objectsToMove = listObjectsResponse.Contents.filter(obj => {
           const currentTime = new Date();
           const lastModifiedTime = obj.LastModified;
           const ageInMillis = currentTime - lastModifiedTime;
           return ageInMillis >= ageThreshold;
       });
       console.log("Moving "+objectsToMove.length);
       // Move each filtered object to the destination bucket
       await Promise.all(objectsToMove.map(async (obj) => {
           const sourceKey = obj.Key;
           const destinationKey = sourceKey;

           // Copy object from source bucket to destination bucket
           if (!deleteOnly){
               await s3.copyObject({
                   Bucket: destinationBucket,
                   CopySource: `/${sourceBucket}/${sourceKey}`,
                   Key: destinationKey
               }).promise();
           }

           // Delete object from source bucket
           await s3.deleteObject({
               Bucket: sourceBucket,
               Key: sourceKey
           }).promise();
       }));

       return {
           statusCode: 200,
           body: "Files moved successfully"
       };
   } catch (err) {
       console.error(err);
       return {
           statusCode: 500,
           body: "Error moving files"
       };
   }
};
13. Click the Deploy button.
| Note: You can use the Test button to test your script. |
14. To schedule when to run your script, click the Add trigger button.
The Add trigger dialog shows.
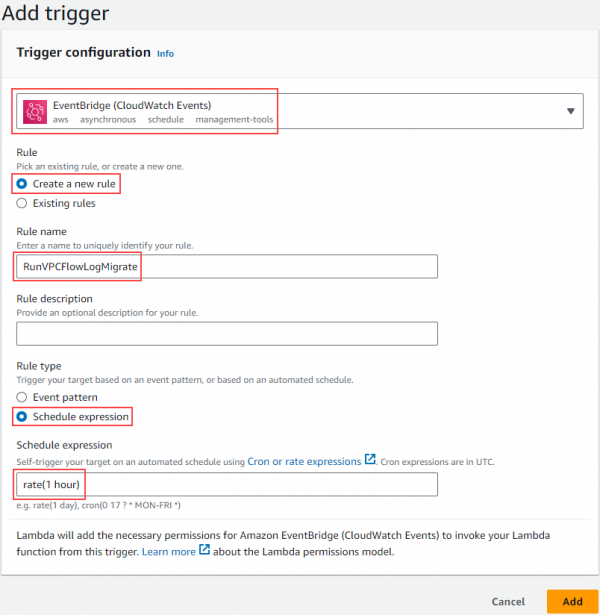
a. Select EventBridge (CloudWatch Events) as the source.
b. In the Rule section select the Create a new rule radio button.
c. In the Rule name field, enter the designation of your newly created rule.
d. In the Rule type section select the Schedule expression radio button.
e. In the Schedule expression field, enter the following value to trigger the script to run every hour:
rate(1 hour)
f. Click the Add button.
The flows migration will now run every hour.
| Note: You can use the Monitor tab on the Lambda > Functions page to verify the progress of the migration process (duration and possible errors). |
